“`html
How to Remove a Graphics Card
Graphics cards, or GPUs, are the heart of any gaming or professional workstation setup. Whether upgrading to a more powerful model or troubleshooting display issues, you might need to remove your current GPU. This comprehensive guide covers everything from initial preparations to potential troubleshooting after removal, ensuring the safety of both you and your PC components during the process. Dive in to understand the essentials of GPU removal and how to safeguard your hardware from permanent damage.
Understanding the Basics: What is a GPU and Why You Might Need to Remove it
Graphics Processing Units (GPUs) are specialized processors designed to handle complex graphics and video rendering tasks. They are integral components in gaming, video editing, and AI processing setups. Depending on your needs, you might want to remove your GPU to upgrade to a faster model that can handle more demanding applications, or even to troubleshoot hardware issues that affect your system’s performance.
Common reasons for GPU removal include upgrading to enhance graphics performance, transferring the GPU to another setup, selling the GPU, or cleaning and maintaining the hardware to prevent overheating and ensure longevity. In each case, understanding the removal process is crucial to prevent damage to your expensive components.
Preparation: Before You Start
Why it’s Necessary to Safely Remove the GPU
Safely removing your GPU is critical to avoiding physical damage to the component and motherboard. A mishandled removal can lead to bent pins, static discharge damage, or broken connectors. Ensuring safe removal not only protects the hardware but also saves you from potentially costly repairs or replacements. Additionally, a secure removal process ensures that the new hardware works properly upon installation.
It also helps to maintain the resale value of the GPU if you’re planning to sell it. Missteps during removal can cause visible damage that might reduce its value or functionality, making a cautious and planned approach essential.
The Right Tools for the Job
To successfully remove a GPU, you’ll need a set of tools. A Phillips-head screwdriver is necessary for removing screws that secure the GPU to the chassis. An anti-static wrist strap will help prevent electrostatic discharge, which could fry sensitive electronics, and a clean, soft cloth can protect the components from static as you handle them.
Additionally, having a container for screws can prevent losing tiny but critical parts during the process. Gathering the right tools in advance ensures that the removal process goes smoothly and efficiently.
Safety Precautions
Before you start, turn off the power supply and unplug the computer to prevent any electrical hazards. It’s also wise to discharge any static electricity by touching a metal object or using an anti-static wrist strap. Ensuring a grounded connection will help prevent damaging static shocks during the process.
Work in an area with adequate lighting and space. A clear, static-free workspace helps keep all components organized and accessible during the removal. Finally, handle the GPU and other components by their edges to avoid damaging sensitive parts.
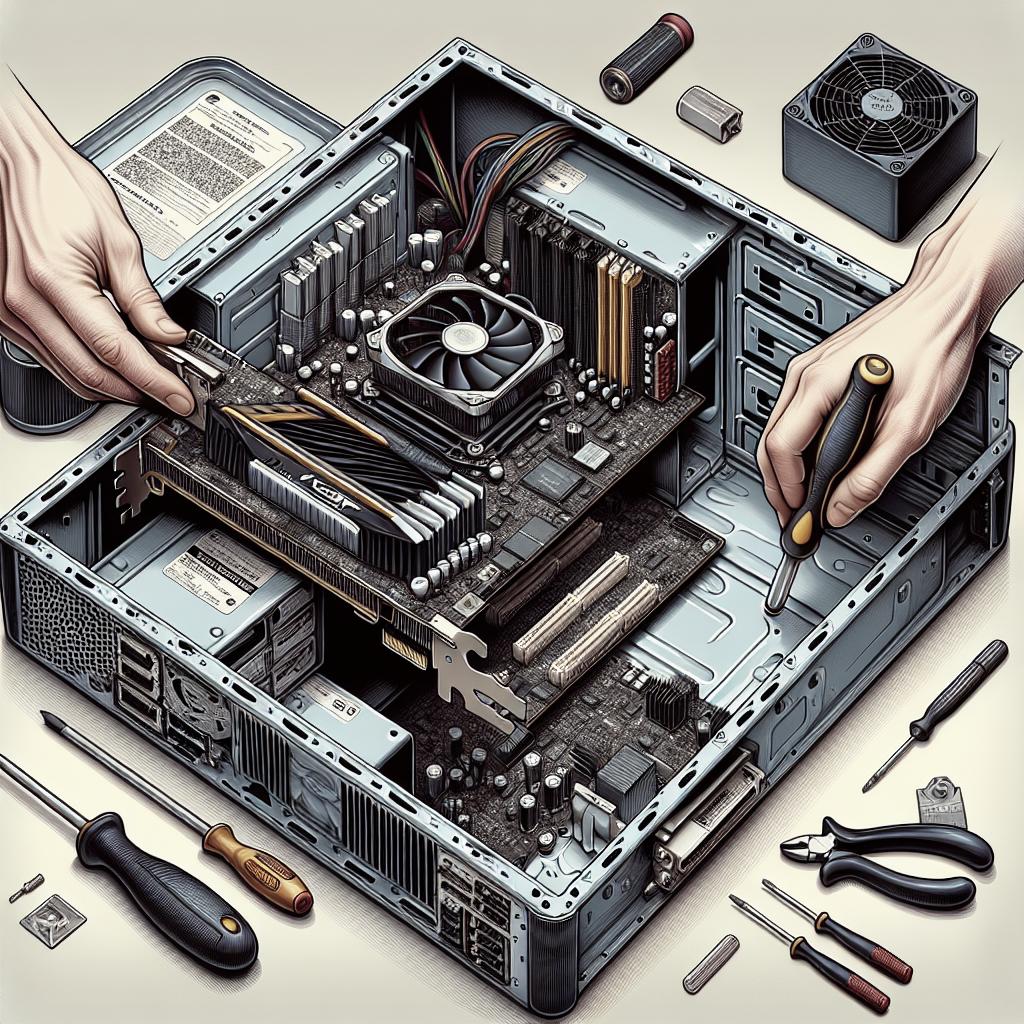
Step-by-step Process: Removing the GPU from the Motherboard
Identifying the GPU on Your Motherboard
To start, locating your GPU is pivotal. Inside the case, spot the PCIe slot in which the GPU rests — it’s usually the largest card attached to your motherboard, often accompanied by HDMI and DisplayPort connectors from its output panel. Knowing what your GPU looks like and exactly where it is positioned is essential before attempting removal.
The GPU is typically fastened to the case frame with screws, usually through a metal bracket. These screws must be identified and removed to free the card from the chassis.
How to Safely Disconnect the GPU
Carefully unplug any power cables attached to the GPU. High-performance GPUs usually require additional power from the PSU and these cables need to be disconnected safely. This step is crucial, as forcibly removing a GPU with cables attached may damage both the card and the connectors.
Next, ensure all screws are removed from the GPU bracket that attaches it to the case. With the power cables and screws out of the way, the card should move slightly within its slot, indicating it’s free for removal.
Removing the GPU from the PCI Slot
To remove the GPU, gently release the retention tab located at the end of the PCIe slot. This tab locks the GPU in place; if neglected, it can break if forcefully removed. Pressing the lever down gently with a thumb will unlock the GPU.
Once the tab is released, gently pull the GPU upward out of its slot. Use consistent pressure and avoid twisting or bending the card to prevent bending the motherboard’s PCI slot or the GPU’s connector pins.
Post-Removal: What to Do After the GPU is Removed
Inspecting the GPU and Motherboard for Damage
Once removed, inspect both the GPU and PCIe slot for any signs of damage, such as bent pins or scratches, which could indicate problems that may affect future operations. Observing any issues early on allows you to take action promptly and efficiently repair any damages.
Checking other components and connectors alongside the GPU during this time helps assure you that nothing was disrupted during the removal process.
Properly Storing the Removed GPU
Store your GPU in an anti-static bag and place it in an environment away from dust, humidity, and static-generating materials. The protective bag prevents static damage, and an ideal storage place will prolong the GPU’s lifespan if you’re planning to store it for future use.
Labeling your GPU and storing it along with any removed screws in a designated container ensures you have all necessary items when the time comes to reinstall or sell the GPU.
Reinstalling a New GPU
To install a new GPU, align the new card with the PCIe slot, ensuring it snaps into place securely as you press down. Reattach the screws and power cables, confirming they are snugly connected. Ensuring a firm connection of the graphics card prevents operation faults later on.
After installation, reconnect power to the computer, boot the system, and install the latest drivers for the new GPU to ensure optimal performance. This helps unlock the new card’s full potential and integrates it into your existing setup seamlessly.
Troubleshooting: Common Issues and How to Solve Them
The GPU Won’t Come Out
If the GPU doesn’t emerge easily, double-check that all screws are removed and cables detached. Often, resistance comes from a missed power connector or grounding screw still in place. Patience and double verification of each step can alleviate these roadblocks.
Repeated gentle pressure rather than forceful pulling is key. Don’t rush; ensuring proper unlock of the retention tab helps in many cases.
You Accidentally Damaged the Motherboard
Accidental damage, such as a scratched PCB or bent connectors, can be mitigated by assessing the type and extent of damage. Minor scratches may not affect functionality, whereas bent pins might require a professional repair.
If identifying damage seems complex, consulting with a service technician could avoid compounding issues and ensure both safe and strategic repair methods are employed.
The New GPU Isn’t Working
Should the new GPU fail after installation, verify that it is properly seated and power connections are accurate. Sometimes resetting the BIOS can aid if the system fails to recognize new hardware.
Updating or reinstalling the drivers for your new GPU can also rectify many conflicts with the existing software environment that might cause malfunctions.
Read Next
Best-Priced RTX 4060 Prebuilt on the Market – Won’t Last Long!
Explore our curated list of the best-priced RTX 4060 prebuilt systems that offer remarkable performance boosts at budget-friendly prices. These won’t be around forever, so snag one while it’s still a great deal!
Top Pick: Meet the 1440p Gaming Beast Under $1400
Need a gaming powerhouse without breaking the bank? Our guide to the top 1440p gaming beast under $1400 delivers exceptional performance while maintaining excellent value for money.
Is This the Best Value Prebuilt PC on the Internet Right Now?
Searching for unbeatable PC hardware? Discover our top pick that’s gaining attention as the best value prebuilt PC available online today!
Performance Meets Aesthetics: Inside the Latest Prebuilt from PC Lab LLC
Dive deeper into the latest release from PC Lab LLC, where performance meets aesthetics. This new prebuilt machine has features designed for anyone looking to upgrade their gaming setup with style.
Summary of Main Points
| Section | Description |
|---|---|
| Understanding the Basics | Overview of what a GPU is, reasons to remove one, and the necessity of doing so safely. |
| Preparation | Tools needed, safety precautions, and the importance of removing the GPU securely. |
| Step-by-step Process | Instructions on identifying, disconnecting, and removing a GPU safely from a motherboard. |
| Post-Removal | Steps to take after GPU removal, including inspecting, storing, and reinstalling a new GPU. |
| Troubleshooting | Solutions for common issues that may arise during GPU removal and new GPU installation. |
“`

